Showing posts with label step by step. Show all posts

Wednesday, December 26, 2012

comment_icon 0 Share your Files using Torrent

Now a days there are lot of websites for sharing your files but still the process become hectic if you are a new-bee or even professional .there is an easy way to share your files using the utorrent . I said easy because you need not to login or upload the file on website , you just need to drag and drop the file or folder on utorrent and it will give a link that you can share with your friends. Here i am going to show you how easy it is to do .


Step 1 : select file or folder and drop it to  utorrent .

drag and drop files
drag and drop

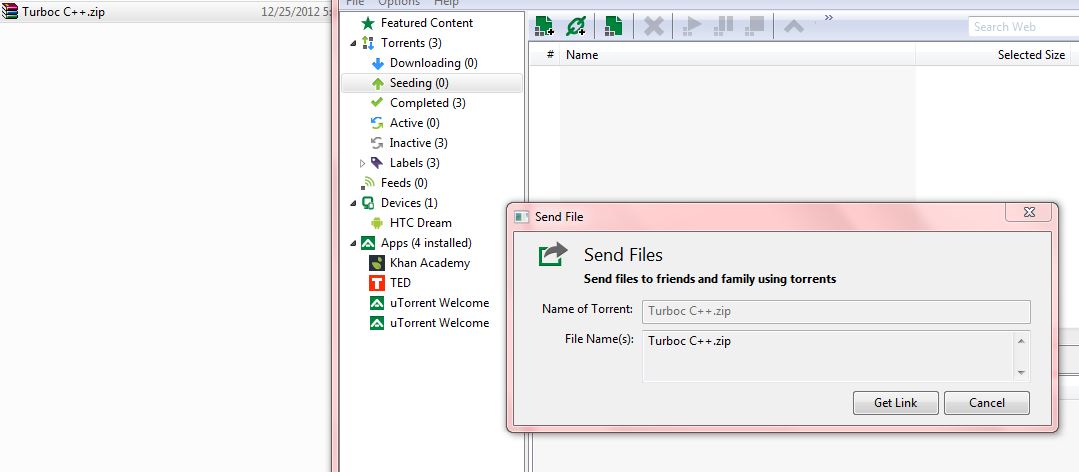
Step 2: click on Get Link button. it will create a link for sharing your files

get link button
Get Link

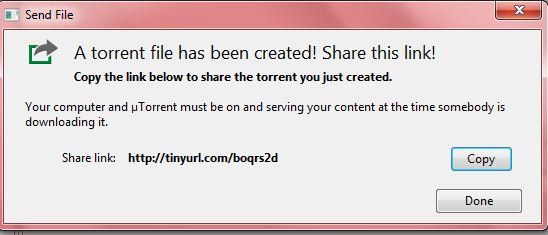
Step 3: now copy the link by clicking copy link button.

copy link
copy link

Step 4 : share link with your friends and you are done.

Steps to be followed by the person to download the files

Step 1: paste the given link in address bar of browser


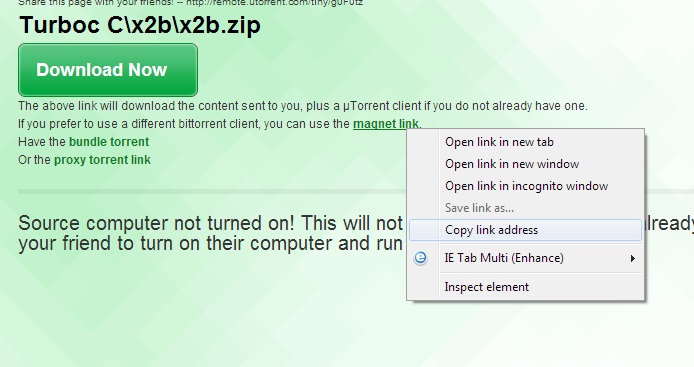
Step 2: if you have you  utorrent  or any other torrent client copy the magnet link otherwise just click on download button.

copy magnet link or download
copy magnet link

Step 2: now we copy the magnet link so we add it to our torrent client.

add magnet link
Add torrent from URL


Step 3: now paste the magnet link and click ok button.

step 4: now your download will start.  enjoy downloading and file sharing :)

download files
downloading

Sunday, August 12, 2012

comment_icon 1 Creating Facebook Application Step By Step Part-3


hello guys this is the third part of the series of Creating Facebook Application step by step . if have haven't seen last part please have a look Developing-A-Facebook-Application-Part-2 In this tutorial i am going to cover the following topics
  • Setting up the environment
  • Clonning your phpfogapp Repository
  • getting facebook php sdk and starting with the example
So lets Start..
  1. Downloading The tools
    if you already have s\installed any of these you can skip that
    Download and install Github for Windows
    Download and install WampServer 2 32 or 64 bit
    Make a full install for both of them, to avoid the unncessary trouble
  2. Next Step is to generating ssh key so here is the process for that
    1. open Git Bash
    2. type
      $ cd ~/.ssh
      If you get "no such file or directory", create the directory:
      $ mkdir ~/.ssh
    3. Generate your key by following command
      $ cd ~/.ssh
      $ ssh-keygen -t rsa
      Generating public/private rsa key pair.
      Enter file in which to save the key (/Users/PHPFog/.ssh/id_rsa):id_rsa (use id_rsa)
      Enter passphrase (empty for no passphrase):(enter your password)
      Enter same passphrase again:
      This password is used to protect the private key.
      Your identification has been saved in /Users/PHPFog/.ssh/id_rsa.
      Your public key has been saved in /Users/PHPFog/.ssh/id_rsa.pub.
      The key fingerprint is:
      31:be:4f:13:d4:68:f1:43:ea:97:9b:33:ad:b6:e5:85 us@phpfog.com
      The key's randomart image is:
      +--[ RSA 2048]----+
      |                 |
      |         .       |
      |        . o      |
      |       . * = .   |
      |        S B E .  |
      |       o = o o   |
      |        o o o .  |
      |         . . o o.|
      |             .+.*|
      +-----------------+
      
    4. Now since the key is genereted . next step is to add this in your phpfog account
      Open your public key with a text editor and copy the entire text.
      A real key will look like:
      ssh-rsa
      AAAAB3NzaC1yc2EAAAADAQABAAABAQDgMaD2kOEQAq0ir0C/U3880mFmpv
      K0/7/qaYx8Uu2GFnsBabIsPJttndqAl6/k1Du4c2s2S+Aem0qS+R4hbSDDuWqjZbEH
      ks5qiAjD64vCavRwl96pKk/bvNB4sCe0MTsrPEU0rzI/MFDkCp8UkwonJkDVGafkhGIu
      UtVrXlCd5JrZFUUvYmLQoLdiTTjCJeBlfG46VqdX2qg4LRN2tMWecYhXrb+ghXsk
      7MfVo+RGQ9pQsiozbd2oROWOsoy2XKPsE2wXXINMpHAg/r6XUzddkW3mAfLAJ
      D7Te78lX+AImxPYhOQccODJlswTTlxKNZuqa9znAGaiyf1pYigHLVD5
      us@phpfog.com
    5. open phpfog goto My Account->settings->ssh keys->add key -> add key details (key name can be any name)

      adding ssh key to phpgog by how2labs.info
  3. now we need to clone the source code from our phpgog git repository . cloning is the process of copying entire project files
    Go to your App Console at PHP Fog and click on the "Source Code" tab on the left.
    cloning git repository by how2labs.info

    Copy the value for "Clone your git repository:", which should look something like:
    $ git clone git@:foo.phpfogapp.com
    Run the command in your terminal, and you should see something like this:
    $  git clone git@git01.phpfog.com:how2labsdemo.phpfogapp.com
    Cloning into 'how2labsdemo.phpfogapp.com'...
    The authenticity of host 'git01.phpfog.com (some ip)' can't be established.
    
    RSA key fingerprint is a6:c5:32:57:cc:21:0c:91:d0:f3:11:43:53:eb:9f:23.
    Are you sure you want to continue connecting (yes/no)? yes
    Warning: Permanently added 'git01.phpfog.com,(some ip)' (RSA) to the list of
    known hosts.
    Enter passphrase for key '/c/Users/Abhi/.ssh/id_rsa':
    remote: Counting objects: 3, done.
    remote: Total 3 (delta 0), reused 0 (delta 0)
    Receiving objects: 100% (3/3), done.
    
  4. Now we can work on our source files change the directory to our project directiry .
    $ cd foo.phpfogapp.com replace foo with your app name for me its how2labsdemo
    now open the index.php file with the following command or you can open it in text editor by going through the following directory
    C:\Users\Abhi\how2labsdemo.phpfogapp.com for windows user only
    command for viewing and editing files with
    To view/edit a file vi filename.extension open file vi index.php
    To save press ESC key enter :w
    To close/quit editing press ESC key enter :q
  5. if you opened the index.php you can see that hello world is wriiten in that i.e. the output we seen in the last part. this index file will get created automatically when we create the app
  6. since now everything is done so we can start developing the app . for this we need the facebok sdk for php . Click here to download facebook php sdk Click on zip option
    Extract the sdk to some directory and follow the stpes
    1. copy the src folder to our local repository i.e. C:\Users\Abhi\how2labsdemo.phpfogapp.com\src . rename src to sdk so final directory will be C:\Users\Abhi\how2labsdemo.phpfogapp.com\sdk with following files
      base_facebook.php  facebook.php  fb_ca_chain_bundle.crt
    2. now open index.php and copy the following code

      <?php

      require 'sdk/facebook.php';

      $facebook = new Facebook(array(

        'appId'  => 'your app id',
        'secret' => 'your app secret',
      ));
      // See if there is a user from a cookie
      $user = $facebook->getUser();
      if ($user) {
        try {
          // Proceed knowing you have a logged in user who's authenticated.
          $user_profile = $facebook->api('/me');
        } catch (FacebookApiException $e) {
          echo '<pre>'.htmlspecialchars(print_r($e, true)).'</pre>';
          $user = null;
        }
      }
      ?>
      <!DOCTYPE html>
      <html xmlns:fb="http://www.facebook.com/2008/fbml">
        <body>
          <?php if ($user) { ?>
            Your user profile is
            <pre>
              <?php print htmlspecialchars(print_r($user_profile, true)) ?>
            </pre>
          <?php } else { ?>
            <fb:login-button></fb:login-button>
          <?php } ?>
          <div id="fb-root"></div>
          <script>
            window.fbAsyncInit = function() {
              FB.init({
                appId: '<?php echo $facebook->getAppID() ?>',
                cookie: true,
                xfbml: true,
                oauth: true
              });
              FB.Event.subscribe('auth.login', function(response) {
                window.location.reload();
              });
              FB.Event.subscribe('auth.logout', function(response) {       
       window.location.reload();
              });
            };
            (function() {
              var e = document.createElement('script'); e.async = true;
              e.src = document.location.protocol +
                '//connect.facebook.net/en_US/all.js';
              document.getElementById('fb-root').appendChild(e);
            }());
          </script>
        </body>
      </html>
      save the file.
    3. Now we need to upload this file to phpfog server so follow the steps given below for that
      1. First step is to add the new files
        $ git add .
        sample output
        warning: LF will be replaced by CRLF in sdk/base_facebook.php.
        The file will have its original line endings in your working directory.
        warning: LF will be replaced by CRLF in sdk/facebook.php.
        The file will have its original line endings in your working directory.
        warning: LF will be replaced by CRLF in sdk/fb_ca_chain_bundle.crt.
        The file will have its original line endings in your working directory.
        The "add" command tells git to "stage" new files in preparation for a commit. The "." tells git to add all the files in the current directory recursively.
      2. Second step is to commit the updation
        $ git commit -m "first commit (or type any message)"
        sample output
        warning: LF will be replaced by CRLF in sdk/base_facebook.php.
        The file will have its original line endings in your working directory.
        warning: LF will be replaced by CRLF in sdk/facebook.php.
        The file will have its original line endings in your working directory.
        warning: LF will be replaced by CRLF in sdk/fb_ca_chain_bundle.crt.
        The file will have its original line endings in your working directory.
         5 files changed, 1773 insertions(+), 1 deletion(-)
         create mode 100644 channel.php
         rewrite index.php (100%)
         create mode 100644 sdk/base_facebook.php
         create mode 100644 sdk/facebook.php
         create mode 100644 sdk/fb_ca_chain_bundle.crt
        This command commits the added file to your git repository. It's still local, but now it's ready to be uploaded (i.e. "pushed").
      3. Last step is push the files that means upload the file
        $ git push
        sample output
          
        Enter passphrase for key '/c/Users/Abhi/.ssh/id_rsa':(enter your password)
         Counting objects: 10, done. Delta compression using up to 2 threads. Compressing objects: 100% (8/8), done. Writing objects: 100% (8/8), 17.77 KiB, done. Total 8 (delta 0), reused 0 (delta 0) remote: -----> Deploying to the cloud
        This command commits the added file to your git repository. It's still local, but now it's ready to be uploaded (i.e. "pushed").
    4. Now we uploded the files so we can see the output file updation may take time so please don't panic. have some coffee in mean time you will get ouput something like this .
      Your user profile is
              Array
      (
          [id] => 100003149296690
          [name] => Abhimanyu Rathore
          [first_name] => Abhimanyu
          [last_name] => Rathore
          [link] => http://www.facebook.com/abhimanyu7nov
          [username] => abhimanyu7nov
          [location] => Array
              (
                  [id] => 102186159822587
                  [name] => Chennai, Tamil Nadu
              )
      
          [education] => Array
              (
                  [0] => Array
                      (
                          [school] => Array
                              (
                                  [id] => 110776898943667
                                  [name] => k.v
                              )
      
                          [type] => High School
                      )
      
                  [1] => Array
                      (
                          [school] => Array
                              (
                                  [id] => 109299605785499
                                  [name] => Dr. MGR University
                              )
      
                          [year] => Array
                              (
                                  [id] => 118118634930920
                                  [name] => 2012
                              )
      
                          [type] => College
                      )
      
                  [2] => Array
                      (
                          [school] => Array
                              (
                                  [id] => 107874392573563
                                  [name] => Dr. M.G.R. Educational and Research Institute
                              )
      
                          [degree] => Array
                              (
                                  [id] => 140065339390579
                                  [name] => B.Tech
                              )
      
                          [year] => Array
                              (
                                  [id] => 118118634930920
                                  [name] => 2012
                              )
      
                          [type] => Graduate School
                      )
      
              )
      
          [gender] => male
          [timezone] => 5.5
          [locale] => en_US
          [verified] => 1
          [updated_time] => 2012-08-06T18:54:13+0000
      )

Saturday, August 4, 2012

comment_icon 2 Creating Facebook Application Step By Step Part-2

in last part we have seen how to create a New Facebook Application
incase you haven't seen it -  Developing-A-Facebook-Application Part 1

In this tutorial we are going to see that what are the Requirements of a facebook application and how we can fulfill them

Requirement of facebook App: 

  1. you need a web hosting ( for hosting your Application)
  2. Web hosting should be https enabled ,that means that your website url should be ssl secured.

How can we fulfill  these requirements:

we have 2 choices here 
 1. we should buy a web hosting and get a ssl certificate for website (too costly)
 2. we can go for a website who provides free web-hosting with ssl 

here we are going through the 2nd choice 

what i am going to use for  hosting  my facebook Applications ?

Ans . I am going to use following

so lets start 

 1.open  https://www.phpfog.com/signup in a new tab and fill up the form


    2. After submitting it will take you to New App wizard  : select Custom app As show in picture


  3.Now fill you domain name it should be unique :

4. Now click on create App it wiil automatically create a New app for you


  5. Now click on view lice site button you will see something like as shown in below picture .don't worry it will take some time in mean time we fill details on facebook

6. open https://developers.facebook.com/apps  in new tab and select your application as shown in picture 

7. now click on edit app button

8. now fill details copy your phpfogApp url . url you can see when  you click view live site . make sure you put https:// in that as shown in picture and don't forget to save it.


9. Now select Auth dialog option here we are going to fill information about the users permission that we are going to need and used in Application  just fill as shown in picture


10 Now just refresh  your phpfogapp site  . if you don't see  hellow worls as shown in picture try using https:// as shown in picture still if won't show than just wait for some time and you can move to the next step.

11 now go to Facebook developer page again and select your app you will see summary page . copy your canvas url from that page and paste it into new tab . this is your facebook application URL


so we successfully hosted our facebook application and we also got htts for facebook app , in next part we are going through the process of writing code for the facebook app and we will also setup the environment for our facebook App development  . for more updates and tutorial please subscribe this blog . i hope you like it . 

Sunday, July 29, 2012

comment_icon 0 Creating Facebook Application Step By Step Part-1

Facebook Applications are the most popular way of publishing the products and several things today. so if you are a developer you should try this,because by this way you can understand that how Facebook apps works and how it can be so critical in some cases.

Do you Really Think its really Hard to build A Facebook App ??

if you say yes then you are wrongs because if you have a little programming concept and little bit web concept you can easily build Facebook Application.

In this tutorial  You are going through a Step by step process of creating Facebook Apps.We are going do build Facebook Application Using phpfog 

Prerequisite For This Tutorial :

  1. Little bit knowledge of  PHP, CSS, JavaScript
  2. A System with with internet Connection .

STEP -1 : Create  New Facebook Application

  1. got to  https://developers.facebook.com/apps  
  2. Click Create New App
  3. fill App Name : Tutorialapp (give some name)
  4. App Namespace: demotutorialapp (give some namespace i.e. going to be your app url)
  5. Don't tick in Check box
  6. Click Continue
  7. fill the Captcha 
  8. A new App will be created for you.
  9. just click Save Changes

Building Facebook Application